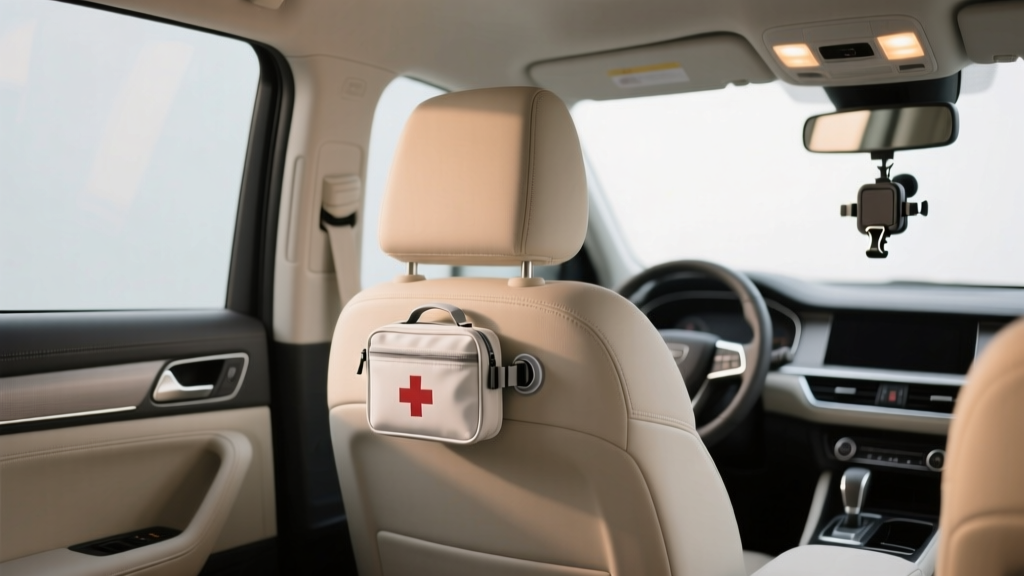
First Aid Kit Mounting Options for Cars (2026)
A first aid kit in your car only helps if you can reach it quickly. The problem is that many kits end up buried under groceries, wedged behind a stroller, or sliding around the trunk until you need it most. Mounting your kit?securely and in a consistent spot?turns it from ?something I own? into ?something I can actually use? during a roadside emergency.
The good news: you don?t need an expensive vehicle-specific bracket or a tactical setup to do this right. With a few inexpensive mounting tools and a bit of planning, you can secure a car first aid kit so it?s accessible, doesn?t become a projectile in a crash, and doesn?t annoy you every time you load the car.
This guide breaks down budget-friendly first aid kit mounting options for common car interiors?sedans, SUVs, trucks, and hatchbacks?along with step-by-step instructions, real-world placement examples, and mistakes to avoid.
What Makes a Good First Aid Kit Mount (Even on a Budget)
Before picking a mounting method, make sure the solution checks a few practical boxes. The ?best? setup is the one you can consistently use, not the one that looks coolest in photos.
Key criteria to prioritize
- Accessibility: You should be able to grab it in under 10 seconds, ideally without unloading cargo.
- Security: It shouldn?t slide, fall, or turn into a projectile during hard braking.
- Heat awareness: Some supplies (certain medications, ointments, adhesive performance) suffer in extreme temperatures. A shaded cabin location can help.
- Visibility: A bright label or red cross patch helps passengers find it quickly.
- Reversibility: Many owners prefer mounts that don?t require drilling, especially on leased vehicles.
Quick sizing tip
Most compact car first aid kits fit into one of these categories:
- Small soft pouch (6?8 in wide): Easy to mount with Velcro or store in a door pocket.
- Medium soft kit (9?12 in wide): Works well under-seat straps, seatback storage, or trunk side panels.
- Hard case kit: More durable, but usually needs straps or a cargo tie-down method to prevent rattles.
Best Budget-Friendly Mounting Methods (With Pros/Cons)
1) Industrial Velcro (Hook-and-Loop) Strips
Best for: Soft kits, light hard cases, quick access locations (seat sides, trunk panels).
- Pros: Cheap, fast install, no drilling, low profile.
- Cons: Adhesive can fail in heat or on textured plastics; may leave residue.
- Typical cost: $5?$15
2) Buckle Straps + Existing Anchor Points
Best for: SUVs/hatchbacks with cargo hooks, sedans with trunk tie-down points, trucks with rear seat anchors.
- Pros: Very secure, handles heavier kits, no sticky residue.
- Cons: Takes a little more time to route straps neatly.
- Typical cost: $8?$20
3) Elastic Seatback Organizers (or MOLLE-Style Panels)
Best for: Family vehicles, rideshare drivers, anyone who wants the kit visible and reachable from the cabin.
- Pros: Adds storage, easy access, no permanent mods.
- Cons: Can interfere with rear passenger knee room; visible clutter if overloaded.
- Typical cost: $12?$35
4) Under-Seat Mounting (Straps or a Low-Profile Tray)
Best for: Drivers who want discreet placement but fast reach.
- Pros: Hidden, protected from sunlight, quick to grab.
- Cons: Must avoid seat rails and wiring; can collect dust.
- Typical cost: $5?$25
5) Adhesive Mounts + Zip Ties (for Trunk Side Panels)
Best for: Trunk mounting without drilling?especially helpful in sedans where side panels are carpeted.
- Pros: Secure and tidy if done well, inexpensive.
- Cons: Adhesive mounts vary in quality; zip ties can look messy if not trimmed.
- Typical cost: $5?$12
Where to Mount Your Kit: Real-World Placement Ideas
Placement depends on how you use your vehicle. Here are practical setups that work in daily driving.
Best cabin locations (fastest access)
- Front passenger seatback: Great for families?anyone can reach it.
- Driver seat side (outer edge): Quick grab at a stop, but ensure it doesn?t interfere with seat movement.
- Center console area: Works for small pouches only; avoid blocking cupholders or shifter movement.
Best cargo-area locations (cleanest look)
- Trunk or cargo side panel: Use Velcro on carpeted surfaces or strap to a cargo hook.
- Inside a rear hatch pocket/cubby: Easy for hatchbacks, but make sure it won?t fall out.
- Spare tire well lid (underside): Hidden, but slower access?better for backup supplies.
Example setups
- Commuter sedan: Medium kit Velcro-mounted to trunk side carpet + small ?boo-boo? pouch in glove box.
- Family SUV: Seatback organizer with kit in a dedicated pocket + trauma shears in a side sleeve.
- Weekend off-roader: Strap-mounted hard case in cargo area tied to factory D-rings + reflective label.
Step-by-Step: Mounting Methods You Can Do in 15?30 Minutes
Method A: Industrial Velcro Mount (fast and clean)
- Pick the surface: Flat plastic, trunk carpet, or a seat side trim panel works best.
- Clean thoroughly: Use isopropyl alcohol on a microfiber cloth; remove dust and protectants.
- Test fit the kit: Sit in the seat or open the trunk and confirm it won?t snag on cargo or seat movement.
- Apply the Velcro: Put the hook side on the car surface and loop side on the kit (or vice versa), following the product instructions.
- Press and hold: Apply firm pressure for 30?60 seconds per strip.
- Let it cure: Many adhesives bond stronger after several hours. If possible, wait overnight before stressing it.
- Do a ?grab test?: Tug the kit sharply once or twice. If it peels, upgrade to more surface area or a strap method.
Method B: Strap to Cargo Hooks (secure for heavier kits)
- Locate anchor points: Look for factory cargo hooks, D-rings, or tie-down loops.
- Choose straps: A small ratchet strap is overkill for most kits; a cam buckle strap or adjustable webbing strap is easier and gentler.
- Position the kit: Place it where it won?t get crushed by luggage?often the side wall of the cargo area.
- Route the strap: Loop through the kit handle or around the kit body, then to the anchor point.
- Tighten and tuck: Snug it down so it doesn?t rattle. Tuck loose strap ends to avoid snagging.
- Verify hatch clearance: Close the trunk/hatch to ensure nothing rubs or pinches.
Method C: Under-Seat Mount (discreet and reachable)
- Safety first: Avoid placing anything near seat motors, wiring harnesses, or airbag-related components under seats.
- Measure clearance: Slide the seat fully forward and backward to confirm the kit won?t bind on rails.
- Use a strap or low tray: A simple strap around a seat frame crossbar can work, but never strap to moving rails.
- Orient for access: Place the zipper/pull tab facing the door side so you can grab it quickly.
- Do a shake test: Drive around the block over bumps; if it shifts, add a non-slip mat or switch to a different mount.
Budget Product Recommendations (What to Look For)
Rather than chasing ?car-specific? branded mounts, focus on materials and features that hold up in a vehicle environment.
Best-value mounting supplies
- Industrial-strength hook-and-loop: Look for high-temperature adhesive ratings and wider strips for better load spread.
- Cam buckle straps (1 inch): Easier than ratchets, plenty strong for first aid kits.
- Adhesive cable tie mounts: Choose larger bases and use multiple mounts for stability.
- Non-slip utility liner: Great as a base layer under a kit to reduce sliding and vibration.
Soft kit vs. hard kit for mounting
- Soft kits: Easier to Velcro, easier to fit in organizers, quieter (less rattle).
- Hard kits: Better crush resistance and moisture protection; usually mount best with straps.
Common Mistakes to Avoid
- Mounting it where cargo will bury it: A trunk kit behind suitcases is effectively ?not there? when you need it.
- Relying on weak adhesive on textured plastic: Many interior plastics have grain that reduces bond strength. Use straps or mount to carpeted panels instead.
- Blocking airbags or safety equipment: Avoid A-pillar areas, steering column surrounds, and side curtain airbag deployment zones.
- Putting it in a spot that interferes with seat travel: Under-seat storage needs clearance across the entire seat range.
- Skipping a heat check: If your car bakes in the sun, consider keeping temperature-sensitive items (meds) in a removable pouch you bring inside.
- Not labeling it: A simple ?FIRST AID? label helps passengers or bystanders find it fast.
Practical Tips for Long-Term Reliability
- Use redundancy if needed: Keep a small, basic kit in the cabin and a fuller kit in the cargo area for road trips.
- Do a quarterly inspection: Check expiration dates, replace used items, and make sure the mount is still tight.
- Plan for ?one-handed access?: If you?re holding pressure on a cut, you should still be able to open the kit (big zipper pulls help).
- Secure loose tools: Trauma shears, tweezers, and flashlight should be in internal loops or pockets so they don?t spill when opened.
- Consider visibility at night: Add a reflective strip or a glow-in-the-dark zipper pull.
FAQ: First Aid Kit Mounting in Cars
Where is the best place to mount a first aid kit in a car?
For most drivers, the best spot is inside the cabin where you can reach it quickly?like the front passenger seatback, a seat-side mount, or an under-seat location that doesn?t interfere with rails or wiring. If you prefer a cleaner look, mount it to a trunk side panel but keep it from being buried by cargo.
Will Velcro hold a first aid kit securely in hot weather?
It can, but it depends on the adhesive quality and the surface. High heat can weaken some adhesives, especially on textured plastics. For hotter climates or heavier kits, consider combining Velcro with a strap, or use cargo hooks and buckle straps for a more reliable hold.
Is it safe to mount a kit under the seat?
Yes, if you avoid seat rails, motors, and wiring. Confirm the kit doesn?t bind when the seat slides, and keep it clear of any components that could be damaged. When in doubt, use a seatback organizer or trunk-side mounting instead.
Should I mount my kit in the trunk or the cabin?
If you want the fastest access during an emergency, choose the cabin. If you prioritize a tidy interior and carry lots of passengers, the trunk can work?as long as the kit is mounted to a side panel and not trapped under luggage. Many owners use a small cabin kit plus a larger trunk kit for trips.
Do I need a special ?car first aid kit mount? product?
No. Most budget-friendly solutions?industrial hook-and-loop, cam buckle straps, and seatback organizers?work extremely well. The key is choosing a method that matches your kit?s weight and your car?s available anchor points.
Actionable Next Steps
- Decide on access priority: Cabin-fast access or cargo-clean look.
- Pick one mounting method: Velcro for light kits, straps for heavier kits, organizer for easy visibility.
- Install and test: Do a tug test, a short drive over bumps, and confirm nothing interferes with seats or airbags.
- Label and maintain: Add a visible ?FIRST AID? marker and set a calendar reminder to inspect quarterly.
Want more practical interior upgrades and storage ideas? Explore more guides on carinteriormix.com and keep your cabin organized, safe, and road-trip ready.