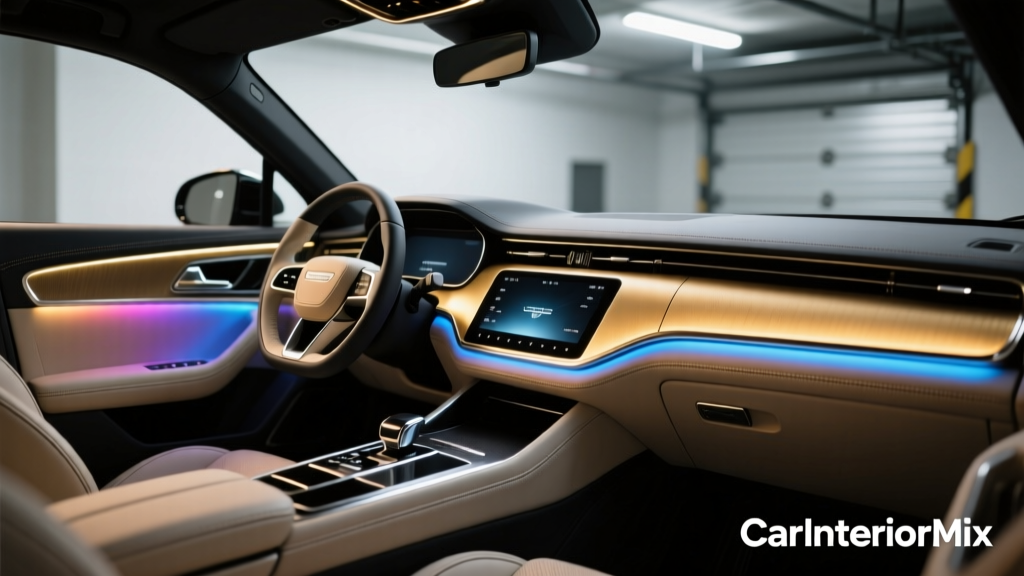
Ambient Lighting Setup: Customization Tips (2026)
Ambient lighting has gone from a ?nice-to-have? glow to a centerpiece of modern car interiors. When it?s set up well, it adds a premium feel, improves nighttime usability, and can even reduce eye strain by softening harsh contrasts between bright screens and dark cabin surfaces. When it?s set up poorly, it looks cheap, distracts the driver, and creates annoying reflections in the windshield.
The good news: you don?t need a show-car budget to get a high-end result. Whether you?re working with factory ambient lighting or adding an aftermarket kit, the difference between ?basic? and ?dialed-in? comes down to planning, placement, color strategy, and smart wiring. This guide covers advanced ambient lighting customization techniques?practical, realistic steps you can use to build a clean, reliable setup that looks factory and functions safely.
Expect real-world tips, product comparisons, and common mistakes to avoid, plus a checklist you can follow the next time you want to refresh your cabin vibe.
Start With a Plan: Define the Look and the Use Case
Before you touch a trim panel or order LED strips, decide what you?re trying to achieve. Ambient lighting can serve different goals, and your choices should match your driving habits and interior layout.
Pick a ?lighting concept?
- Factory-plus: Subtle, evenly diffused light in OEM-like locations (door cards, dash line, footwells). Minimal hotspots, no visible LEDs.
- Driver-focused: Gentle glow around controls and touchpoints to support night driving?footwell, center console, door handles, storage pockets.
- Show mode: Brighter, animated, music-reactive setups for meets and events, while still maintaining a safe ?drive mode? preset.
- Theme build: Coordinated with interior accents?stitching color, trim finish, wrap color, or audio build lighting.
Choose zones (and decide what to skip)
More lighting isn?t always better. The highest-end cabins focus on clean lines and consistent brightness.
- High-impact zones: Door trims, dash strip, footwells, center console edges.
- Nice additions: Cupholders, under-seat rear footwell, glovebox, trunk area.
- Often best avoided: Bright lighting near windshield/upper dash, reflective trim edges, and direct line-of-sight LED points that create ?dotting.?
Factory Ambient Lighting vs Aftermarket Kits: What You?re Working With
Factory systems (OEM ambient lighting)
Factory setups are integrated into the car?s electronics and usually offer stable dimming, consistent color calibration, and clean diffusion. The limitation is that upgrade paths can be expensive, and some trims only provide a single color or limited zones.
- Pros: Best fit/finish, reliable dimming, fewer rattles, easier daily usability.
- Cons: Limited customization, higher cost to retrofit, sometimes locked behind software coding.
Aftermarket systems
Aftermarket ambient lighting ranges from basic LED strips to fiber-optic kits and full RGBIC (addressable) systems. The best kits can look nearly OEM if you prioritize diffusion, correct placement, and tidy wiring.
- Pros: Huge customization, multiple zones, animations, more budget-friendly.
- Cons: Quality varies widely; poor wiring or placement can cause glare, failures, or parasitic battery drain.
Advanced Customization Technique #1: Layered Lighting (The Pro Look)
Layered lighting means using different types of light for different tasks, rather than making one strip do everything. This is how premium interiors avoid harsh brightness while still feeling ?lit.?
The three layers to aim for
- Accent layer (visual line): Door/dash light guides, thin LED channels, or fiber optics for a continuous line.
- Task layer (function): Footwells, storage pockets, cupholders?enough light to locate items without turning on a dome light.
- Soft fill (depth): Gentle under-console or under-dash glow that adds dimensionality without calling attention to itself.
Real-world example
If your car has a large center screen, add a warm, low-brightness footwell light (task layer) and a subtle dash line (accent layer). This reduces the ?floating screen in a dark cave? effect while keeping reflections off the windshield.
Advanced Customization Technique #2: Diffusion and Hotspot Control
Nothing screams ?aftermarket? like visible LED dots or uneven brightness. The fix is diffusion: spreading the light evenly before it hits your eyes.
Best diffusion options
- LED channels with diffusers: Aluminum or plastic channels with a milky lens create a smooth line. Great for under-dash and console edges.
- EL wire / EL tape: Produces an even glow, but often dimmer than LEDs and may not match modern RGB colors perfectly.
- Fiber-optic kits: A light source feeds a fiber line; looks continuous and OEM-like in door/dash seams.
- ?Neon? silicone LED rope: Highly diffused, flexible, bright; ideal for under-seat and footwell areas (choose carefully to avoid bulky edges).
Placement tricks that instantly improve results
- Hide the source: Mount LEDs so you see the glow, not the strip.
- Avoid reflective surfaces: Piano black and glossy trim can mirror bright LEDs.
- Use indirect angles: Aim light toward carpet or a matte surface rather than outward.
Advanced Customization Technique #3: Smart Color Strategy (Not Just ?Pick RGB?)
Great ambient lighting looks coordinated. Random colors across zones create visual noise and reduce perceived quality.
Use two presets: ?Drive mode? and ?Show mode?
- Drive mode: Dim, calm colors that reduce glare?ice blue, soft cyan, warm white/amber, or a single brand-themed color.
- Show mode: Brighter with animations or music sync for parked use.
Color temperature tips
- Warm white (around 2700K?3500K): Cozy, luxury feel; pairs well with tan interiors and wood trim.
- Neutral white (around 4000K): Clean and modern; good for black/gray cabins.
- Cool white/blue tones: Futuristic, but can create more reflections and feel harsh if too bright.
Match the interior materials
- Red stitching or sporty accents: Try deep red or magenta at low brightness instead of pure ?laser red.?
- Brown/tan leather: Amber or warm white tends to look factory.
- Carbon fiber + black interior: Cyan, blue, or neutral white can look crisp?keep it dim.
Advanced Customization Technique #4: Zone Control and Synchronization
Multi-zone control is where ambient lighting starts feeling premium. The goal is consistency: zones should be balanced in brightness and react together.
Options for controlling zones
- App-controlled RGB/RGBIC controllers: Great for customization; look for memory function so your setting returns after restart.
- Physical switches/dimmers: More reliable and faster to use while driving; less flashy but very practical.
- CAN bus integration modules: Advanced option that can tie lighting to ignition, door open, dimmer wheel, and factory infotainment on some cars (requires careful compatibility checks).
Balance brightness across zones
Footwells often appear brighter than door strips because they illuminate lighter carpets. Compensate by:
- Lowering footwell brightness 20?40% relative to dash/doors
- Using a warmer color in footwells if your dash strips are cooler (warm colors feel less intense)
- Adding diffusion to footwell lighting to soften hotspots
Step-by-Step: Building a Clean Aftermarket Ambient Lighting Setup
This approach works whether you?re installing a full kit or upgrading a few zones. Always follow your vehicle?s service manual guidance and use safe wiring practices.
Step 1: Choose your lighting type and layout
- Sketch zones: doors, dash, front footwells, rear footwells, console/cupholders.
- Select lighting per zone (fiber for door/dash lines, diffused strips for footwells, small modules for pockets).
- Decide on controller type (app + remote, or hard switch + dimmer).
Step 2: Power strategy (do this before installing anything)
- Pick a safe power source: An add-a-fuse from an ignition-switched circuit is common (so lights shut off with the car).
- Add protection: Use an inline fuse if your kit doesn?t include proper protection.
- Plan grounding: Use a solid chassis ground point; avoid flimsy screws into thin metal or plastic.
- Avoid battery drain: Don?t wire to constant 12V unless you have a timed shutoff module.
Step 3: Prep surfaces and test fit
- Clean mounting surfaces with isopropyl alcohol.
- Dry-fit channels or strips before peeling adhesive backing.
- Test the kit on a bench power source or the car (temporarily) to confirm all zones work.
Step 4: Install and hide the wiring
- Route wiring along factory harness paths where possible.
- Use fabric automotive tape to prevent rattles and protect wires from sharp edges.
- Leave service loops (a little slack) at trim junctions so panels can be removed later.
- Secure controllers away from heat sources and moving parts.
Step 5: Calibrate brightness and set presets
- At night, set all zones to white first and balance brightness so no area dominates.
- Create a ?Drive? preset: 10?30% brightness, stable color (no animations).
- Create a ?Park/Show? preset: higher brightness, animations/modes if desired.
- Confirm memory behavior after ignition cycle.
Product Recommendations: What?s Worth Buying (and What to Look For)
Because quality varies massively, focus on features and build quality rather than chasing the cheapest kit.
Best use-case matches
- OEM-like door and dash lines: Fiber-optic ambient light kits with a strong, quiet light engine and consistent connectors.
- Footwells and under-seat glow: Diffused ?neon? style silicone LED strips with mounting clips (adhesive alone often fails on carpeted plastics).
- Storage pockets/cupholders: Small LED pods/modules with frosted lenses to avoid hotspots.
Comparison checklist (use this before purchasing)
- Controller memory: Does it remember your last setting after the car restarts?
- Dimming quality: Smooth dimming without flicker, buzzing, or stepping.
- Wiring quality: Thicker gauge wires, secure connectors, strain relief.
- Noise: Some cheaper controllers whine (especially with PWM dimming).
- Diffusion: Look for frosted lenses or channels?avoid bare LED tape in visible areas.
- Support and documentation: Clear diagrams and consistent labeling save hours.
Common Mistakes to Avoid
- Mounting LEDs where they?re directly visible: You?ll get dotting and glare. Hide the strip and show only the glow.
- Over-bright settings while driving: Bright blue/purple lighting can be distracting and cause windshield reflections.
- Wiring to constant power without a shutoff plan: Battery drain complaints usually start here.
- Skipping surface prep: Dirty trim = adhesive failure = sagging strips and rattles.
- Poor wire management: Loose wires cause buzzes, pinched insulation, and intermittent faults.
- Mixing mismatched color outputs: Combining different LED types can make ?white? look different across zones.
- Ignoring legal/safety considerations: Some regions restrict certain colors or flashing lights visible from outside the vehicle. Keep it subtle and interior-focused.
Troubleshooting: Quick Fixes for Real Problems
- Flicker when starting the car: Move power to a more stable ignition source, add a relay, or use a controller with voltage stabilization.
- One zone is dimmer: Check connector seating, wire length/voltage drop, and ensure you?re not exceeding controller channel limits.
- Adhesive won?t stick: Use adhesion promoter, switch to mounting clips, or install into a channel instead of bare plastic.
- Rattles after reinstalling trim: Add fabric tape at contact points and confirm wiring isn?t trapped between clips.
FAQ: Advanced Ambient Lighting Setup Customization
What?s the best ambient lighting color for night driving?
Warm white/amber or soft cyan at low brightness tends to be the most comfortable. The best choice is the one that doesn?t reflect in your windshield and doesn?t fight your screen brightness. Start dim and increase only as needed.
Will ambient lighting drain my battery?
It can if it?s wired to constant 12V or if the controller doesn?t shut down properly. Use an ignition-switched fuse tap or a timed shutoff module, and verify the lights turn off completely after you lock the car.
Are RGBIC (addressable) systems worth it compared to standard RGB?
RGBIC is worth it if you want multi-color effects on one strip and smoother animations. For a factory-plus look, standard RGB with good diffusion is often easier to make look OEM and less ?busy.?
How do I make aftermarket ambient lighting look factory?
Prioritize diffusion, hide the LED source, follow factory wiring routes, and keep brightness modest. The most convincing OEM-style installs are clean lines with consistent intensity?no visible dots, no loose wires.
Can I integrate ambient lighting with factory controls?
Sometimes. Certain vehicles support CAN bus modules or retrofit coding that can sync lighting with the infotainment and dimmer. Compatibility varies widely by make/model/year, so confirm with vehicle-specific forums, wiring diagrams, or a reputable installer.
Why does my ?white? look blue or purple on some strips?
Not all LEDs produce the same white balance. Cheaper RGB strips often create ?white? by mixing colors, which can skew cool. A dedicated white channel (RGBW) or higher-quality LEDs usually produces a cleaner white.
Next Steps: Make Your Lighting Cleaner, Safer, and More Personal
If you want the biggest upgrade with the least hassle, start by improving diffusion and dialing in a proper ?Drive mode? preset. Then expand zone-by-zone?footwells, doors, dash line?testing brightness and reflections at night as you go. The goal is a cabin that feels cohesive and premium, not a rainbow spotlight.
When you?re ready, take a few night photos of your current setup, note what looks uneven or distracting, and build a simple plan: zones, power source, controller, and color strategy. A little upfront thinking saves hours of rework.
For more interior upgrades, lighting ideas, and practical install tips, explore the latest guides on carinteriormix.com.